
Flowers
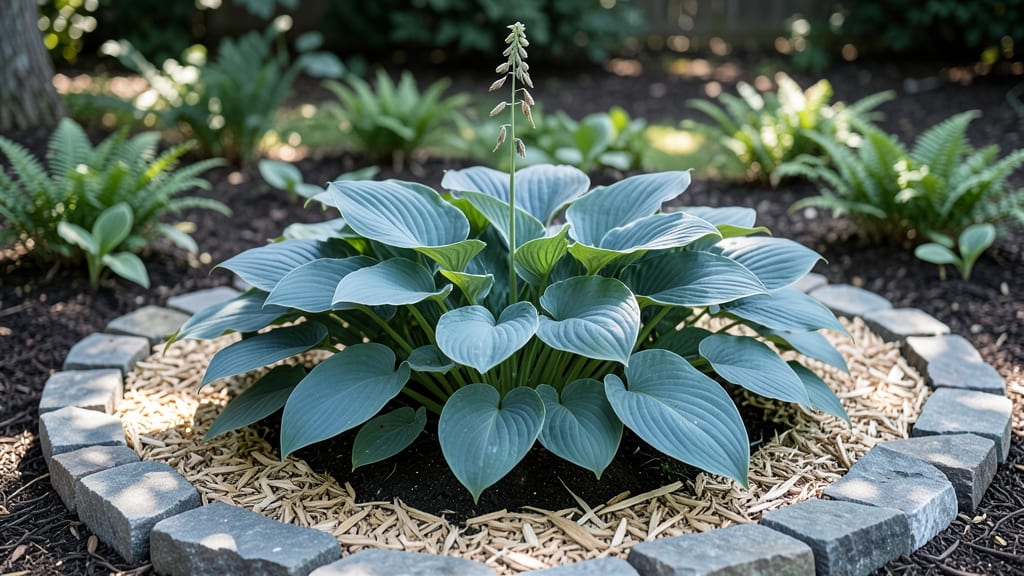
A hosta flower bed transforms shady corners into lush, textured gardens that feel like a secret retreat. 🌿 I remember my first hosta planting—those broad, velvety leaves instantly softened the darkest spot in my yard, and now I can’t imagine a shade garden without them.
The key lies in layering hostas with other shade-tolerant plants, creating depth and year-round interest without fighting for sunlight.
Start with hostas as your foundation—choose varieties with different leaf colors and textures, like the deep blue of 'Blue Angel' or the golden edges of 'Francee'. Pair them with ferns for delicate fronds, heucheras for vibrant foliage, and astilbes for airy summer blooms.
A well-planned bed needs 18-24 inches of spacing between mature plants to prevent crowding, and mulch heavily to keep roots cool and moist.
What you’ll end up with is a living tapestry that thrives when others struggle. The scent of damp leaves after rain, the way sunlight filters through variegated foliage, and the quiet hum of pollinators visiting late-season blooms—it’s a garden that rewards patience.
Hostas even handle drought better once established, making them the foolproof backbone of any shade design.
This approach works for everything from small city courtyards to sprawling woodland gardens. Whether you’re filling a 3-foot-wide border or a 10-foot-square patch, the principles stay the same: layer, repeat, and let the hostas shine. Ready to bring that shady spot to life?
📚 In This Guide
- What you need
- Instructions
- Tips and common mistakes
- Wrapping up and next steps
What you need
- ● Hostas: 15-25 plants (mix of sizes for depth; choose varieties like 'Blue Angel,' 'Halcyon,' or 'Francee' for diversity)
- ● Soil: 10 cubic yards of high-quality, well-draining garden soil (amend with 5 cubic yards of compost for fertility)
- ● Mulch: 2-3 bags of organic mulch (e.g., shredded bark or wood chips, 2-3 inches thick)
- ● Fertilizer: 10-20 lbs of slow-release, balanced fertilizer (10-10-10 or organic options like fish emulsion)
- ○ Watering system: Garden hose with a spray nozzle or drip irrigation kit (optional but recommended for consistency)
- ● Garden tools: 1 trowel
- ● 1 garden fork
- ● 1 wheelbarrow (for soil/mulch)
- ● 1 pair of pruning shears
- ● 1 rake (for leveling soil)
- ● Measuring tools: Measuring tape and stakes (to mark bed layout)
- ● Protective gear: Gloves, knee pads, and a sun hat (for comfort)
- ○ Optional enhancers: Decorative stones or edging (for borders)
- ● Companion plants (e.g., ferns, astilbes, or heucheras for contrast)
- ● Lightweight landscape fabric (to suppress weeds)
Step-by-Step guide to designing a thriving hosta flower bed
Here's how to create a layered shade garden that thrives year after year.
🌱 Step 1: Select and Prepare Your Planting Site
Hostas thrive in partial to full shade with 6-8 hours of filtered light daily. Scout your garden for a spot that receives morning sun and afternoon shade—this prevents leaf scorch while encouraging lush foliage. Avoid areas with strong afternoon sun or wind exposure, which can dry out leaves prematurely.
Clear the area of weeds and grass, then loosen the soil to a depth of 12 inches using a garden fork. Hostas prefer well-draining, rich soil with a pH between 6.5 and 7.5. Amend the soil with 2-3 inches of compost or aged manure to improve fertility and moisture retention. Test the soil moisture by pressing your finger 2 inches deep—it should feel damp but not soggy.
🪴 Step 2: Choose and Plant Hostas with Strategic Layering
Select hostas with varying heights (6-36 inches), leaf textures (smooth, corrugated, blue-green), and bloom times (spring to summer) to create visual interest. For a 4-person flower bed, plant 3-5 hosta varieties as anchor plants, spacing them 18-24 inches apart depending on mature size. Larger varieties (like 'Blue Angel') go at the back, while smaller ones (like 'Halcyon') fill the front.
Dig holes twice as wide as the root ball but only as deep. Gently remove the plant from its container, loosen the roots if pot-bound, and place it in the hole so the crown sits just below soil level. Fill the hole with soil, pressing lightly to eliminate air pockets. Water deeply until the soil settles—this helps roots establish contact with the surrounding earth.
☀️ Step 3: Add Understory Plants and Mulch for Long-Term Care
Fill gaps between hostas with shade-tolerant companions like ferns, astilbes, or heucheras to create a lush, multi-layered effect. These plants should be spaced 12-18 inches apart and planted at the same depth as their containers. Water each new addition thoroughly to help them settle into the soil.
Spread 3-4 inches of mulch (like shredded bark or wood chips) over the entire bed, keeping it 2 inches away from plant stems to prevent rot. Mulch conserves moisture, suppresses weeds, and regulates soil temperature—critical for hostas, which appreciate consistent conditions. Replenish mulch annually in early spring to maintain its protective layer.
💧 Step 4: Establish a Watering and Maintenance Routine
Water newly planted hostas deeply 2-3 times per week for the first 4-6 weeks to encourage root growth. After establishment, water 1-2 times per week, adjusting for rainfall—hostas wilt dramatically when thirsty but recover quickly once rehydrated. Check soil moisture by pressing your finger 1-2 inches deep; water when it feels dry.
Fertilize in early spring with a slow-release, balanced fertilizer (10-10-10) applied at half strength. Avoid high-nitrogen fertilizers, which promote leafy growth at the expense of blooms. Divide overcrowded hostas every 3-5 years in early spring or fall, selecting healthy clumps with 3-5 leaves to replant or share.
Tips & tricks for perfect hosta flower beds
Here's what I've learned after creating dozens of these lush shade gardens—tricks that make all the difference between a good bed and a showstopper.
Layering Strategy: When selecting hostas in Step 2, aim for a height progression of at least 6 inches between each tier. I always place the tallest varieties (24-36 inches) at the back, then medium heights (12-24 inches) in the middle, and dwarf varieties (6-12 inches) at the front. This creates that magical "waterfall" effect where each layer frames the one behind it. Pro tip: Use blue-green varieties in the back—they'll make the golden and chartreuse hostas in front pop even more.
Soil Prep Secret: Before amending that 12-inch depth in Step 1, I always run a soil test first. If your soil pH is below 6.5, add powdered lime (about 1/2 cup per square foot) and mix it in with your compost. Hostas are forgiving, but they'll reward you with bigger, healthier leaves when the pH is just right. For sandy soils, add 1 inch of peat moss to help retain moisture during those first critical 4-6 weeks of watering.
Mulch Timing: That 3-4 inch mulch layer in Step 3 should go on right after planting, not weeks later. The mulch helps regulate soil temperature from day one, preventing those temperature swings that stress young roots. I use cedar mulch because it naturally repels slugs—those pests love tender hosta leaves. Just remember to pull it back 2 inches from the crown to prevent rot.
Watering Hack: During those first 4-6 weeks, I set up a simple drip irrigation system on a timer for 15 minutes twice daily. This ensures consistent moisture without the risk of overwatering. After establishment, I switch to deep watering every 3-4 days during dry spells. The key is getting that water down to 2 inches deep—hostas have shallow roots, so surface watering won't cut it.
Pro Tips for Hosta Flower Bed
- Here's what I've learned after creating dozens of these lush shade gardens—tricks that make all the difference between a good bed and a showstopper.
- Layering Strategy: When selecting hostas in Step 2, aim for a height progression of at least 6 inches between each tier.
- Soil Prep Secret: Before amending that 12-inch depth in Step 1, I always run a soil test first.
Frequently asked questions
How do I choose the right hostas for my flower bed?
Hostas vary in size, color, and texture—so pick based on your bed’s light conditions and design goals. For deep shade, opt for varieties like ‘Blue Angel’ or ‘Patriot’. Smaller hostas (e.g., ‘Pandora’) work well in front layers, while bold giants like ‘Sum and Substance’ steal the show in back. Mix textures (e.g., ruffled vs. smooth leaves) for visual interest!
When is the best time to plant hostas in my flower bed?
Plant hostas in early spring or fall when soil is cool but workable—this gives roots time to establish before extreme heat or cold. Avoid planting in mid-summer, as stress from transplant shock can stunt growth. If you’re adding hostas to an existing bed, water deeply before and after planting to reduce shock.
Why are my hostas’ leaves turning yellow or brown?
Yellowing leaves often signal overwatering or poor drainage, while brown edges can mean sunburn, slug damage, or nutrient deficiencies. Check soil moisture (hostas like consistently moist but not soggy soil) and inspect leaves for chewed edges (a slug’s calling card!). Amend soil with compost and mulch to retain moisture and deter pests.
What are some great companion plants for hostas in a shade garden?
Pair hostas with shade-tolerant perennials like heuchera (coral bells), ferns, astilbe, or Japanese painted ferns for layered texture. For height, add foxglove or lungwort, and for pops of color, try impatiens or bleeding heart. Avoid competitive plants like invasive ground covers that can choke hostas.
Can I grow hostas in containers instead of a flower bed?
Hostas thrive in large containers (at least 12–18 inches deep) with well-draining soil. Choose compact varieties like ‘June’ or ‘Halcyon’ for pots, and place them in partial to full shade. Water containers frequently (they dry out faster than in-ground beds) and fertilize lightly in spring. Drainage holes are a must to prevent root rot!
Pro Tip:
Mulch your hosta flower bed with 3–4 inches of organic mulch (like shredded bark) to lock in moisture, suppress weeds, and regulate soil temperature. Refresh mulch annually—it breaks down fast and keeps your bed looking neat and lush!
Wrapping up and next steps
Creating a stunning hosta flower bed is all about embracing shade with confidence and creativity! 🌿 With the right plant selection, soil prep, and a little patience, you’ll transform even the darkest corners of your garden into a thriving, lush oasis.
Whether you’re a seasoned gardener or just starting out, every layer of foliage and bloom adds depth—and joy—to your outdoor space.
Ready to dive in? Start small with a single bed or go bold with a full garden makeover. Grab your gloves, sketch your design, and let nature do the rest! Your future shady sanctuary is waiting.