
Flowers
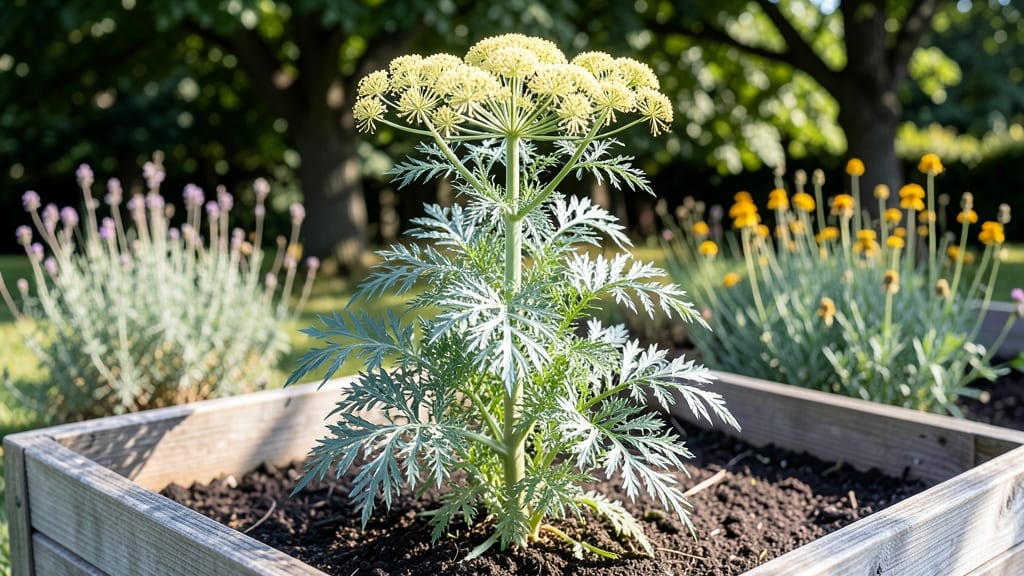
Those delicate, lacy yellow dill weed flowers transform your garden into a fragrant, edible paradise—if you know when and how to encourage them. 🌻 I used to pull them off thinking they’d ruin the harvest, but now I wait eagerly for their arrival every summer, knowing they’re just as valuable as the leaves.
The secret to abundant dill blooms starts with patience and proper spacing. Plant seeds 6-8 inches apart in full sun, and avoid overcrowding—tight plants put energy into leaves, not flowers.
Once stems reach 12-18 inches tall, you’ll see those feathery umbels appear, signaling the plant’s natural transition from leaf production to seed-setting.
Harvesting the flowers at their peak—when they’re fully open but before they brown—adds a bright, herbal note to salads, garnishes, or even infused oils. The blooms also attract pollinators, turning your dill patch into a mini ecosystem.
Plus, if you let some flowers mature, you’ll get seeds for next year’s crop.
For a second flush of blooms, trim back the plant by one-third after the first harvest. This trick works especially well in warm climates where dill keeps growing through fall. Just avoid heavy pruning too late in the season, or you might stunt seed production.
📚 In This Guide
- What you need
- Instructions
- Tips and common mistakes
- Wrapping up and next steps
What you need
- ● Dill seeds – Choose heirloom or organic seeds (e.g., Anethum graveolens) for best flavor and bloom quality. 1–2 oz (30–60g) per planting is ideal.
- ● Well-draining potting mix – A blend of 60% garden soil, 30% compost, and 10% perlite or sand works best. Avoid heavy clay.
- ● Containers or garden bed – For containers, use pots at least 6 inches deep with drainage holes. For beds, ensure full sun (6+ hours/day) and loose soil.
- ● Watering can or hose with a gentle spray nozzle – Dill hates soggy roots, so precision is key!
- ○ Fertilizer (optional but helpful) – A balanced 10-10-10 or fish emulsion (diluted to half-strength) boosts growth. Apply every 4–6 weeks.
- ● Hand trowel or small shovel – For planting seeds and loosening soil.
- ○ Twine or stakes (optional) – Tall dill (up to 4–5 feet) may need support in windy areas.
- ● Pruning shears – To harvest flowers or trim leggy stems for bushier growth.
- ○ Row cover or shade cloth (optional) – Protects seedlings from pests or harsh sun in early stages.
- ● Labels & markers – Helpful if growing multiple herbs in one space!
- ● Warmth & patience – Dill thrives in USDA Zones 2–11 but needs soil temps above 60°F (15°C) to germinate.
- ● Sunlight access – No compromises here: full sun is non-negotiable for robust blooms.
- ● Consistency – Dill prefers regular watering (1 inch/week) but detests waterlogged soil.
Step-by-step guide to growing dill weed flowers
Here's how to cultivate fragrant, edible dill blooms that'll attract pollinators and elevate your dishes.
🌱 Step 1: Choose the Right Location and Prepare Soil
Dill thrives in full sun—at least 6-8 hours daily—so pick a spot where it gets morning sunlight and afternoon warmth. I always test soil moisture first by squeezing a handful: if it crumbles but holds shape, it's perfect. Amend heavy clay with 2-3 inches of compost to improve drainage, since dill roots hate soggy conditions.
Loosen the top 6 inches of soil with a garden fork to help roots establish. Scatter 1 teaspoon of bone meal (optional but helpful) per planting area to boost phosphorus for strong stems. This step ensures your dill will grow tall and sturdy enough to support those delicate flower clusters.
🌱 Step 2: Plant Seeds at the Correct Depth and Spacing
Sow seeds ¼ inch deep, pressing them lightly into the soil—don't bury too deep, or they'll struggle to emerge. Space them 12-18 inches apart in rows 18 inches apart to allow room for their feathery foliage to spread. I like to plant in clusters of 3-4 seeds every 12 inches for a more abundant harvest.
Water gently right after planting until the soil feels evenly moist but not saturated. Keep the area consistently damp until germination, which usually happens in 7-14 days at 60-70°F. If your soil dries out too quickly, mulch with 1 inch of straw to retain moisture and prevent crusting.
☀️ Step 3: Maintain Consistent Watering and Fertilization
Once seedlings reach 4 inches tall, reduce watering to 1-1.5 inches per week, letting the top 1-2 inches of soil dry slightly between waterings. Overwatering causes dill to bolt prematurely, so always check moisture before adding more. I water in the morning to let foliage dry quickly, which prevents fungal diseases.
Side-dress with ½ cup of compost when plants reach 12 inches tall to encourage flowering. Avoid high-nitrogen fertilizers—they promote leafy growth at the expense of those fragrant blooms. You'll know you're on track when stems develop thick, hollow bases and leaves reach 12-18 inches in height.
✂️ Step 4: Harvest Flowers for Culinary and Pollinator Use
Harvest flower clusters when they're half-open for the best flavor and aroma. Use clean, sharp scissors to snip stems 2-3 inches below the bloom, leaving lower leaves intact to keep the plant producing. I always harvest in the morning after dew has dried, when essential oils are at their peak concentration.
For continuous blooms, trim back any spent flowers immediately after harvest. This encourages secondary flowering and keeps your dill productive for 6-8 weeks. Store harvested flowers in a paper bag in the fridge for up to 5 days, or dry them in bundles upside down in a dark, airy space for 1-2 weeks.
🌿 Step 5: Extend the Season with Proper Care
To prolong flowering, protect plants from hard frosts by covering them with frost cloth or moving containers indoors. Dill is biennial, so if you let some plants overwinter, they'll often resprout in spring. I've had dill regrow from the same roots for two consecutive years in mild climates.
Watch for swollen stems in late summer—this signals bolting, the plant's natural transition to flowering. While bolting reduces leaf production, it's essential for seed development. If you want more leaves, pinch back flower stalks early, but if you're growing for blooms, let them develop naturally. The more you harvest, the more your dill will reward you with abundant, fragrant flowers.
Tips & tricks for perfect dill weed flower cultivation
Here's what I've learned from growing these fragrant blooms year after year—tricks that'll help you avoid common pitfalls and maximize your harvest.
Sunlight Strategy: Those 6-8 hours of sunlight are non-negotiable, but here's the thing: morning sun is more important than afternoon warmth. I've noticed my dill thrives best when it gets that intense morning light to kickstart photosynthesis. If you're in a hot climate, provide afternoon shade to prevent leaf scorch while still getting those crucial morning rays.
Soil Preparation Secret: The 2-3 inches of compost recommendation is perfect, but don't stop there. I always mix in a handful of perlite or coarse sand to prevent compaction—dill roots need that air space to breathe. This simple addition can double your success rate, especially in heavy clay soils where drainage becomes an issue.
Germination Timing: Those 7-14 days for germination can feel like forever, but here's my trick: place a clear plastic dome or bag over your newly planted seeds to create a mini greenhouse effect. This maintains consistent moisture and warmth at the soil surface, often bringing germination within the 7-day window. Just be sure to remove it once sprouts appear to prevent fungal issues.
Harvesting Hack: When harvesting those half-open flowers, I always look for clusters where the tiny buds are just starting to unfurl—this is when their essential oils are at peak concentration. Pro tip: harvest in batches every 2-3 days rather than all at once. This staggered approach keeps your plants producing continuously and prevents bolting from stress.
Pro Tips for Dill Weed Flowers
- Here's what I've learned from growing these fragrant blooms year after year—tricks that'll help you avoid common pitf...
- Sunlight Strategy: Those 6-8 hours of sunlight are non-negotiable, but here's the thing: morning sun is more importan...
- Soil Preparation Secret: The 2-3 inches of compost recommendation is perfect, but don't stop there. I always mix in a...
Frequently asked questions
Got questions about growing and using dill weed flowers?
Here are some of the most common queries—plus quick, practical answers to help you cultivate these fragrant blooms with confidence!
When do dill weed flowers actually bloom?
Dill weed flowers typically bloom 60–70 days after planting (or 45–50 days from seed if started indoors). Look for delicate, flat-topped clusters of tiny yellow-green umbels that appear in late spring to early summer. For a longer harvest, plant seeds in successive batches every 2–3 weeks—this ensures fresh blooms all season!
How long do dill weed flowers last once cut?
Freshly cut dill weed flowers stay vibrant for 3–5 days in a glass of water on the counter (like a bouquet!). For longer storage, hang bundles upside-down in a dry, dark place—they’ll dry fully in 1–2 weeks. Once dried, store in an airtight container for up to 6 months and use in teas, potpourri, or dried recipes.
Can I eat dill weed flowers raw, or do I need to cook them?
Dill weed flowers are 100% edible raw and pack a mild, anise-like flavor. Toss them into salads, garnish soups, or blend into dressings for a fresh kick. Pro tip: For a stronger flavor, lightly crush the blooms between your fingers before adding to dishes. They’re also fantastic in pickling (try dill flowers in homemade pickles for a unique twist!).
What should I do if my dill weed flowers turn brown or wilt?
Brown or wilted dill flowers usually signal overmaturity, heat stress, or pests. If the stems are still green, the flowers may just be ready to harvest—cut them before they fully brown. For wilting, check for aphids or spider mites (spray with soapy water if needed). If the plant is bolting too early (shooting up fast), ensure it gets partial shade in hot climates and consistent watering.
Are there any alternatives to dill weed flowers for cooking or crafts?
If you’re out of dill weed flowers, try these flavorful substitutes:
- Fennel flowers (similar anise flavor, but stronger).
- Carrot or cilantro flowers (milder, but edible and decorative).
- Dried dill seeds (crush them for a seed-like texture in recipes).
- Chamomile or lavender buds (for crafts or teas—just avoid eating lavender if allergic!).
Wrapping up and next steps
Growing dill weed flowers is a rewarding journey that brings beauty, fragrance, and edible delights to your garden! 🌸 Whether you're a seasoned gardener or just starting out, these versatile blooms are easy to cultivate and perfect for adding a fresh, herbal touch to your meals.
With the right care, you’ll enjoy a bountiful harvest of fragrant flowers and lush greens.
Ready to bloom with confidence? Start by planting your seeds this season and watch your garden transform into a fragrant paradise. Happy growing! 🌱