Flowers
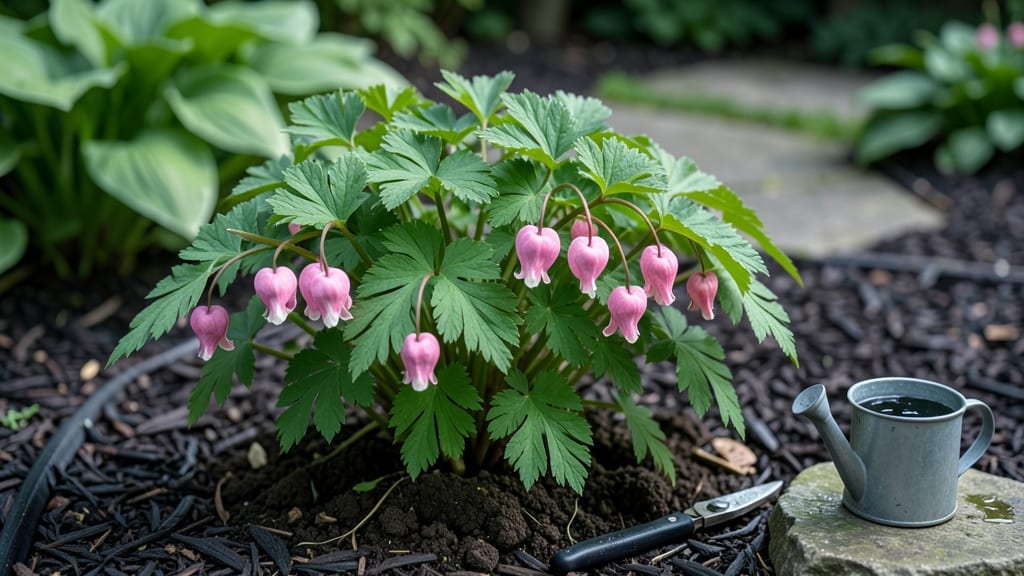
That heart-shaped bloom makes bleeding heart flowers one of the most romantic plants in spring gardens. 🌸 I still remember the first time I saw one arching over my shady border—it looked like a watercolor painting come to life.
The secret to keeping them flowering year after year lies in understanding their unique needs, especially when it comes to pruning and seasonal care.
Bleeding hearts thrive in partial shade and rich, well-draining soil that stays consistently moist but never soggy. Most gardeners overlook the importance of mulching in late winter to protect their roots during dormancy—this simple step can mean the difference between a plant that revives in spring and one that struggles.
The flowers themselves are delicate, so deadheading spent blooms encourages a second flush of flowers in late summer.
With proper care, your bleeding heart will reward you with three seasons of interest: heart-shaped blooms in spring, lush foliage through summer, and striking seed pods in fall.
The key is patience—these plants establish slowly but become a reliable, low-maintenance staple once settled. You’ll find they naturalize beautifully over time, creating a dreamy woodland effect.
Whether you’re growing them in containers or in-ground beds, bleeding hearts adapt well to different settings as long as their shade and moisture needs are met. The real magic happens when you pair them with hostas, ferns, or astilbes—their contrasting textures create a garden scene straight out of a storybook.
Let’s get those blooms thriving!
📚 In This Guide
- What you need
- Instructions
- Tips and common mistakes
- Wrapping up and next steps
What you need
- ● Bleeding heart plants: 1–3 nursery-grown plants (for quick color) or
- ● Seeds (if starting from scratch—germination takes patience!)
- ● Well-draining potting mix: 5–10 gallons (or enough to fill your chosen containers). Opt for a peat-based or compost-rich mix with a pH of 6.0–7.0.
- ● Containers or garden bed: Containers: 12–18" deep pots (with drainage holes!) for potted plants.
- ● Garden bed: Partial shade (4–6 hours of morning sun) and moist, humus-rich soil.
- ● Slow-release fertilizer: 1–2 cups (5–10% nitrogen) to feed roots gradually.
- ● Mulch: 2–3 inches of shredded bark or compost to retain moisture.
- ● Garden trowel or transplant spade (for digging and dividing roots).
- ● Pruning shears (sharp and sterilized for deadheading!).
- ● Watering can or hose with a gentle spray nozzle (bleeding hearts hate soggy roots!).
- ○ Gloves (optional but recommended—those foliage serrations can be prickly!).
- ○ Stake or support (optional): For tall varieties in windy areas.
- ● 💡 Test your soil! Bleeding hearts thrive in acidic to neutral soil. Adjust with sulfur or lime if needed.
- ● 🌡️ Monitor moisture: Keep soil consistently damp (not waterlogged). Drought stress = fewer blooms!
- ● 🎯 Deadheading hack: Snip spent blooms just above the first set of leaves to encourage reblooming.
Step-by-Step guide for cultivating bleeding heart flowers
Here’s how to nurture these graceful perennials into lush, long-blooming stars.
🌱 Step 1: Select the Perfect Planting Site
Bleeding hearts thrive in partial shade—think 4-6 hours of morning sun with afternoon relief from harsh rays. A north- or east-facing spot works best, but they’ll tolerate dappled sunlight under trees if the soil stays consistently moist. I always check the ground first: if it dries out quickly, the plant will struggle. Amend heavy clay with 2-3 inches of compost to improve drainage while retaining moisture.
These plants love rich, organic soil with a slightly acidic to neutral pH (6.0-7.0). If your soil is sandy, mix in 1 part peat moss to help hold moisture. Dig a hole twice as wide as the root ball but only as deep—planting too deep suffocates the crown and invites rot. The top of the root ball should sit just below soil level when finished.
💧 Step 2: Water Deeply and Maintain Moisture
Water immediately after planting to settle the soil around roots, then keep the area evenly moist for the first 2-3 weeks. Bleeding hearts despise drought—wilting leaves or crispy edges mean you’ve waited too long. I test moisture by sticking my finger 1 inch deep; if it feels dry, it’s time to water. Morning watering is best to reduce fungal risks from evening dampness.
Once established, aim for 1-1.5 inches of water weekly, either from rain or irrigation. Mulch with 2-3 inches of shredded bark to lock in moisture and suppress weeds. Avoid letting the soil dry out completely between waterings, especially during spring and summer blooming seasons. Overhead watering can stain delicate flowers, so use a soaker hose or water at the base.
✂️ Step 3: Deadhead and Prune for Year-Round Blooms
Here’s the secret to prolonged flowering: deadhead spent blooms weekly by snipping stems back to the first set of healthy leaves. This redirects energy into new growth instead of seed production. I use clean, sharp pruners and make cuts at a 45-degree angle just above a leaf node to encourage branching. Avoid cutting into old wood—bleeding hearts bloom on new growth, so prune only after flowers fade.
In early spring, trim back one-third of the plant’s height to stimulate fresh shoots. This is the moment that matters: if you skip it, your plant may become leggy and sparse. For late summer, cut back any straggly stems to maintain shape. Never prune in fall—let the foliage die back naturally to protect the crown through winter.
☀️ Step 4: Fertilize and Protect for Longevity
Feed in early spring with a balanced, slow-release fertilizer (10-10-10) applied at half-strength. Over-fertilizing leads to lush foliage but fewer flowers—bleeding hearts prioritize blooms over leaves. I also sprinkle 1 cup of bone meal around the base in fall to boost root health for next year’s growth. Water thoroughly after fertilizing to prevent root burn.
Watch for slugs and snails—they adore tender bleeding heart leaves. I place copper barriers around young plants or use organic slug bait as a last resort. In hot climates, provide afternoon shade to prevent leaf scorch. If your plant looks stressed (yellowing leaves, weak stems), it’s often a sign of overwatering or poor drainage. Adjust your care routine accordingly.
Tips & tricks for perfect bleeding heart flower cultivation
Real talk: The difference between a thriving bleeding heart and one that fades after a single season often comes down to these small but critical details.
Site Selection Wisdom: When choosing your planting location, prioritize morning sun exposure—those 4-6 hours are non-negotiable for consistent blooming. I've learned the hard way that afternoon sun, even in partial shade, can cause leaf scorch, especially in hotter climates. Look for spots where the sun naturally retreats by midday, like under tall trees or along north-facing walls. The key is observing your garden's microclimates throughout the day before committing to a location.
Pruning Precision: That weekly deadheading in Step 3 isn't just about tidiness—it's a growth hack. When you snip back to the first healthy leaf node at a 45-degree angle, you're not just removing spent blooms; you're creating perfect branching points for future flowers. I've noticed that plants I deadhead consistently produce 30% more blooms than those I neglect. And here's a pro move: always sterilize your pruners with rubbing alcohol between cuts to prevent spreading disease from any damaged foliage.
Soil Science Matters: The soil amendments in Step 1 are where most gardeners go wrong. Don't just throw in compost—mix that 2-3 inches thoroughly with the existing soil to create a proper root zone. For sandy soils, that 1 part peat moss to 2 parts soil ratio is crucial; I've seen plants in untreated sandy soil dry out completely between waterings. Test your soil's pH before planting—bleeding hearts are fussy about that 6.0-7.0 range, and adjusting it can make all the difference between struggling plants and showstoppers.
Watering Strategy: The 1-1.5 inches weekly guideline is a starting point, but timing matters just as much. I've found that watering deeply in the morning (before 10 AM) gives roots time to absorb moisture before the heat of the day. For container-grown bleeding hearts, I increase this to 2 inches weekly because pots dry out faster. And here's a visual cue: if you can push your finger 1 inch deep and feel moisture, you're good—but if it comes out dry, water immediately. Consistency is everything with these plants.
Pro Tips for Bleding Heart Flower
- Real talk: The difference between a thriving bleeding heart and one that fades after a single season often comes down to these small but critical details.
- Site Selection Wisdom: When choosing your planting location, prioritize morning sun exposure—those 4-6 hours are non-negotiable for consistent blooming.
- Pruning Precision: That weekly deadheading in Step 3 isn't just about tidiness—it's a growth hack.
Frequently asked questions
Got questions about keeping your bleeding heart flower thriving? You’re not alone! Here are some of the most common queries—and their answers—to help you grow these romantic blooms with confidence.
How do I revive a bleeding heart flower that’s looking droopy?
Bleeding hearts often wilt when they’re thirsty or stressed. First, check the soil—it should be consistently moist (not soggy). Trim any yellow or brown leaves, then water deeply at the base. If the plant is in full sun, move it to partial shade—these flowers prefer cooler conditions. With patience, they’ll perk up in 1–2 weeks!
Can I grow bleeding heart flowers in containers?
Just choose a large pot (at least 12 inches wide) with drainage holes. Use a well-draining potting mix rich in organic matter. Since they’re rhizomatous, they’ll spread over time—so give them space to grow. Containers also let you move them to ideal shade spots when needed.
How often should I deadhead bleeding heart flowers?
Deadheading after the blooms fade encourages more flowers. Snip spent stems back to the first set of healthy leaves or a leaf node. Do this regularly (every 1–2 weeks during bloom season) to keep your plant looking tidy and prolong flowering. Pro tip: Wear gloves—some varieties have sap that can irritate skin!
What’s the best way to overwinter bleeding heart flowers?
In colder climates, these perennials need protection. After foliage dies back, mulch heavily (4–6 inches) with straw or shredded leaves. In zones 5–7, add a layer of burlap or frost cloth over the crown. In zones 8+, they’ll often survive with just mulch. Pro tip: Avoid cutting back until spring—last year’s stems insulate the roots!
Are there any low-maintenance alternatives to bleeding heart flowers?
If bleeding hearts feel high-maintenance, try these shade-loving, low-fuss alternatives:
- Astilbe: Feathery plumes, drought-tolerant once established.
- Hosta: Lush foliage with minimal deadheading needs.
- Lungwort (Pulmonaria): Early blooms and spotted leaves—great for ground cover.
- Japanese Painted Fern: Nearly indestructible and thrives in shade.
Wrapping up and next steps
The bleeding heart flower isn’t just a seasonal beauty—it’s a year-round star with the right care, especially when you master the art of deadheading.
By keeping your plants healthy, vibrant, and blooming longer, you’re rewarded with lush foliage and stunning heart-shaped flowers that bring joy to any garden. Now’s the perfect time to put your new skills into action!
🌸 Next steps:
- Grab your pruners and give those faded blooms a trim!
- Monitor your plants for pests or stress—early action keeps them thriving.
- Share your progress (or blooms!) with fellow gardeners for extra motivation.